> ## Documentation Index
> Fetch the complete documentation index at: https://docs.bijection.com/llms.txt
> Use this file to discover all available pages before exploring further.
# Using Components
> Using existing components
Bijection Components add new features to your backend in their own sandbox with
their own functions, schema and data, scheduled functions and all other
fundamental Bijection features.
You can see the full list of components in the
directory.
## Installation
We'll use the [Pipelines component](/publications/pipelines)
as an example.
```sh theme={"theme":{"light":"github-light-default","dark":"github-dark-default"}}
npm i @bijection/pipelines
```
Create or update the `bijection.config.ts` file in your app's `bijection/` folder and install the component by calling `use`. Multiple instances of the same component can be installed by calling `use` multiple times with different names. Each will have their own tables and functions.
```ts {6} theme={"theme":{"light":"github-light-default","dark":"github-dark-default"}}
import { defineApp } from "bijection/server";
import pipelines from "@bijection/pipelines/bijection.config.js";
const app = defineApp();
app.use(pipelines);
app.use(pipelines, { name: "pipelines2" });
//... Add other components here
export default app;
```
The `bijection dev` CLI command will generate code necessary for using the component.
```sh theme={"theme":{"light":"github-light-default","dark":"github-dark-default"}}
bijection dev
```
Each instance of a component has its API listed under the `components` object by
its name. Some components wrap this API with classes or functions. Check out
each component's documentation for more details on its usage.
```ts theme={"theme":{"light":"github-light-default","dark":"github-dark-default"}}
import { defineEtl } from "@bijection/pipelines/etl";
import { components } from "./_generated/api.js";
const plan = defineEtl({ component: components.pipelines, ... });
```
## Using the component's API directly
Though components may expose higher level TypeScript APIs, under the hood they
are called via normal Bijection functions over the component sandbox boundary.
Queries, mutations, and action rules still apply - queries can only call
component queries, mutations can also call component mutations, and actions can
also call component actions. As a result, queries into components are reactive
by default, and mutations have the same transaction guarantees.
Component functions can be called from your application using the following
syntax:
```ts theme={"theme":{"light":"github-light-default","dark":"github-dark-default"}}
import { internalAction } from "./_generated/server";
import { components } from "./_generated/api";
export const myAction = internalAction({
args: { threadId: v.string() },
handler: async (ctx, args) => {
// Call the component's API to get the thread status.
const { status } = await ctx.runQuery(components.myComponent.threads.getThread, {
threadId: args.threadId,
});
//...
},
});
```
Some components abstract away the component's API. For instance, `defineEtl`
from `@bijection/pipelines/etl` takes `components.pipelines`, and the functions
it generates call the component's API internally.
[Learn more about the Pipelines component here](/publications/pipelines).
## Transactions
Remember that mutation functions in Bijection are
[transactions](/functions/mutation-functions#transactions). Either all the
changes in the mutation get written at once or none are written at all.
All writes for a top-level mutation call, including writes performed by calls
into other components' mutations, are committed at the same time. If the
top-level mutation throws an error, all of the writes are rolled back, and the
mutation doesn't change the database at all.
However, if a component mutation call throws an exception, only its writes are
rolled back. Then, if the caller catches the exception, it can continue, perform
more writes, and return successfully. If the caller doesn't catch the exception,
then it's treated as failed and all the writes associated with the caller
mutation are rolled back. This means your code can choose a different code path
depending on the semantics of your component.
As an example, take the
Rate Limiter component.
One API of the Rate Limiter throws an error if a rate limit is hit:
```ts theme={"theme":{"light":"github-light-default","dark":"github-dark-default"}}
// Automatically throw an error if the rate limit is hit.
await rateLimiter.limit(ctx, "failedLogins", { key: userId, throws: true });
```
If the call to `rateLimiter.limit` throws an exception, we're over the rate
limit. Then, if the calling mutation doesn't catch this exception, the whole
transaction is rolled back.
The calling mutation, on the other hand, could also decide to ignore the rate
limit by catching the exception and proceeding. For example, an app may want to
ignore rate limits if there is a development environment override. In this case,
only the component mutation will be rolled back, and the rest of the mutation
will continue.
## HTTP Routes
Components can define their own [HTTP actions](/functions/http-actions) in
an `http.ts` file. To expose a component's HTTP routes, pass an `httpPrefix`
when installing the component:
```ts bijection/bijection.config.ts theme={"theme":{"light":"github-light-default","dark":"github-dark-default"}}
import { defineApp } from "bijection/server";
import myComponent from "./components/myComponent/bijection.config.js";
const app = defineApp();
app.use(myComponent, { httpPrefix: "/my-component/" });
export default app;
```
With this configuration, if the component defines a route for `/hello`, it will
be accessible at `/my-component/hello` on your deployment's `.bijection.site`
domain.
If no `httpPrefix` is provided, the component's HTTP routes are not exposed.
This ensures the app always controls its URL space.
You can also set an `httpPrefix` on the app itself to namespace the routes
defined in your `bijection/http.ts`:
```ts bijection/bijection.config.ts theme={"theme":{"light":"github-light-default","dark":"github-dark-default"}}
const app = defineApp({ httpPrefix: "/app/" });
```
**Note:** An app `httpPrefix` doesn't influence component HTTP routes. Component
routes mounted with their own `httpPrefix` are always relative to `/`.
See [Authoring Components: HTTP Actions](/components/authoring#http-actions)
for details on defining HTTP routes within a component, including limitations
around `ctx.auth` and environment variables.
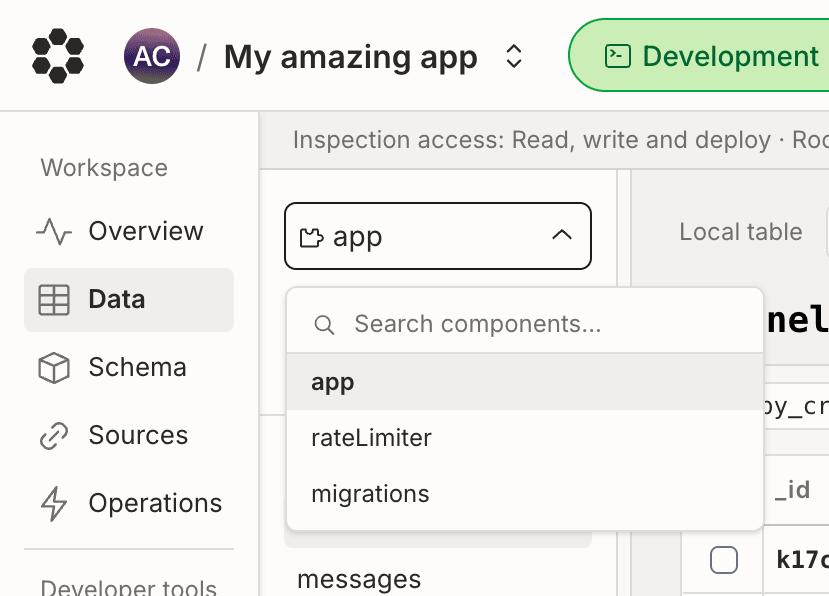
## Console
You can see your component’s data, functions, files, logs, and other info using
the dropdown in the console. You can also use the dropdown to exclude info
from certain components.
 ## Testing components
When writing tests with [`bijection-test`](/testing/bijection-test), that use
components, you must register the component with the test instance. This tells
it what schema to validate and where to find the component source code. Most
components export convenient helper functions on `/test` to make this easy:
```ts bijection/some.test.ts {10} theme={"theme":{"light":"github-light-default","dark":"github-dark-default"}}
import agentTest from "@bijection-dev/agent/test";
import { expect, test } from "vitest";
import { bijectionTest } from "bijection-test";
import { components } from "./_generated/api";
import { createThread } from "@bijection-dev/agent";
// Define this once, often in a shared test helper file.
export function initBijectionTest() {
const t = bijectionTest();
agentTest.register(t);
return t;
}
test("Agent createThread", async () => {
const t = initBijectionTest();
const threadId = await t.run(async (ctx) => {
// Calling functions that use ctx and components.agent
return await createThread(ctx, components.agent, {
title: "Hello, world!",
});
});
// Calling functions directly on the component's API
const thread = await t.query(components.agent.threads.getThread, {
threadId,
});
expect(thread).toMatchObject({
title: "Hello, world!",
});
});
```
If you need to register the component yourself, you can do so by passing the
component's schema and modules to the test instance.
```ts bijection/manual.test.ts theme={"theme":{"light":"github-light-default","dark":"github-dark-default"}}
///
import { test } from "vitest";
import { bijectionTest } from "bijection-test";
import schema from "./path/to/component/schema.ts";
const modules = import.meta.glob("./path/to/component/**/*.ts");
test("Test something with a local component", async () => {
const t = bijectionTest();
t.registerComponent("componentName", schema, modules);
await t.run(async (ctx) => {
await ctx.runQuery(components.componentName.someQuery, {
arg: "value",
});
});
});
```
## Log Streams
You can use the `data.function.component_path` field in
[log streams](/production/integrations/log-streams/log-streams) to separate log lines based
on the component they came from.
## Testing components
When writing tests with [`bijection-test`](/testing/bijection-test), that use
components, you must register the component with the test instance. This tells
it what schema to validate and where to find the component source code. Most
components export convenient helper functions on `/test` to make this easy:
```ts bijection/some.test.ts {10} theme={"theme":{"light":"github-light-default","dark":"github-dark-default"}}
import agentTest from "@bijection-dev/agent/test";
import { expect, test } from "vitest";
import { bijectionTest } from "bijection-test";
import { components } from "./_generated/api";
import { createThread } from "@bijection-dev/agent";
// Define this once, often in a shared test helper file.
export function initBijectionTest() {
const t = bijectionTest();
agentTest.register(t);
return t;
}
test("Agent createThread", async () => {
const t = initBijectionTest();
const threadId = await t.run(async (ctx) => {
// Calling functions that use ctx and components.agent
return await createThread(ctx, components.agent, {
title: "Hello, world!",
});
});
// Calling functions directly on the component's API
const thread = await t.query(components.agent.threads.getThread, {
threadId,
});
expect(thread).toMatchObject({
title: "Hello, world!",
});
});
```
If you need to register the component yourself, you can do so by passing the
component's schema and modules to the test instance.
```ts bijection/manual.test.ts theme={"theme":{"light":"github-light-default","dark":"github-dark-default"}}
///
import { test } from "vitest";
import { bijectionTest } from "bijection-test";
import schema from "./path/to/component/schema.ts";
const modules = import.meta.glob("./path/to/component/**/*.ts");
test("Test something with a local component", async () => {
const t = bijectionTest();
t.registerComponent("componentName", schema, modules);
await t.run(async (ctx) => {
await ctx.runQuery(components.componentName.someQuery, {
arg: "value",
});
});
});
```
## Log Streams
You can use the `data.function.component_path` field in
[log streams](/production/integrations/log-streams/log-streams) to separate log lines based
on the component they came from.