> ## Documentation Index
> Fetch the complete documentation index at: https://docs.bijection.com/llms.txt
> Use this file to discover all available pages before exploring further.

# Bijection & Clerk

> Integrate Clerk authentication with Bijection

export const provider_0 = "Clerk"

export const configProp_0 = 
<>
  Clerk's{" "}
  <a
    href="https://clerk.com/docs/guides/development/customize-redirect-urls"
    target="_blank"
  >
    redirect URL props or environment variables
  </a>
</>

export const providerProvider_0 = <code>ClerkProvider</code>

export const integrationProvider_0 = <code>BijectionProviderWithClerk</code>

[Clerk](https://clerk.com) is an authentication platform providing login via
passwords, social identity providers, one-time email or SMS access codes, and
multi-factor authentication and user management.

## Get started

Bijection offers a provider that is specifically for integrating with Clerk called
`<BijectionProviderWithClerk>`. It works with any of Clerk's React-based SDKs, such
as the Next.js and Expo SDKs.

See the following sections for the Clerk SDK that you're using:

* [React](#react) - Use this as a starting point if your SDK is not listed
* [Next.js](#next-js)
* [TanStack Start](#tanstack-start)

### React

**Example:**
React with Bijection and Clerk

This guide assumes you already have a working React app with Bijection. If not
follow the [Bijection React Quickstart](/quickstart/react) first. Then:

<Steps>
  <Step title="Sign up for Clerk">
    Sign up for a free Clerk account at [clerk.com/sign-up](https://dashboard.clerk.com/sign-up).

    <p style={{textAlign: 'center'}} />
  </Step>

  <Step title="Create an application in Clerk">
    Choose how you want your users to sign in.

    <p style={{textAlign: 'center'}} />
  </Step>

  <Step title="Activate the Bijection integration in Clerk">
    In the Clerk Dashboard, activate the [Bijection integration](https://dashboard.clerk.com/apps/setup/bijection).

    <p style={{textAlign: 'center'}} />

    Copy your Clerk app's *Frontend API URL*. In development, its format will be `https://verb-noun-00.clerk.accounts.dev`. In production, its format will be `https://clerk.<your-domain>.com`.
  </Step>

  <Step title="Configure Bijection with the Clerk issuer domain">
    In your app's `bijection` folder, create a new file `auth.config.ts` with the following code. This is the server-side configuration for validating access tokens.

    ```ts theme={"theme":{"light":"github-light-default","dark":"github-dark-default"}}
    import { AuthConfig } from "bijection/server";

    export default {
      providers: [
        {
          // Replace with your Clerk Frontend API URL
          // or with `process.env.CLERK_JWT_ISSUER_DOMAIN`
          // and configure CLERK_JWT_ISSUER_DOMAIN on the Bijection Dashboard
          // See https://docs.bijection.com/auth/clerk#configuring-dev-and-prod-instances
          domain: process.env.CLERK_JWT_ISSUER_DOMAIN!,
          applicationID: "bijection",
        },
      ]
    } satisfies AuthConfig;
    ```
  </Step>

  <Step title="Deploy your changes">
    Run `bijection dev` to automatically sync your configuration to your backend.

    ```sh theme={"theme":{"light":"github-light-default","dark":"github-dark-default"}}
    bijection dev
    ```
  </Step>

  <Step title="Install clerk">
    In a new terminal window, install the Clerk React SDK:

    ```sh theme={"theme":{"light":"github-light-default","dark":"github-dark-default"}}
    npm install @clerk/react
    ```
  </Step>

  <Step title="Set your Clerk API keys">
    In the Clerk Dashboard, navigate to the [**API keys**](https://dashboard.clerk.com/last-active?path=api-keys) page. In the **Quick Copy** section, copy your Clerk Publishable Key and set it as the `CLERK_PUBLISHABLE_KEY` environment variable. If you're using Vite, you will need to prefix it with `VITE_`.

    ```env theme={"theme":{"light":"github-light-default","dark":"github-dark-default"}}
    VITE_CLERK_PUBLISHABLE_KEY=YOUR_PUBLISHABLE_KEY
    ```
  </Step>

  <Step title="Configure BijectionProviderWithClerk">
    Both Clerk and Bijection have provider components that are required to provide authentication and client context.

    You should already have `<BijectionProvider>` wrapping your app. Replace it with `<BijectionProviderWithClerk>`, and pass Clerk's `useAuth()` hook to it.

    Then, wrap it with `<ClerkProvider>`. `<ClerkProvider>` requires a `publishableKey` prop, which you can set to the `VITE_CLERK_PUBLISHABLE_KEY` environment variable.

    ```tsx {5-6,13-14,16-17} theme={"theme":{"light":"github-light-default","dark":"github-dark-default"}}
    import React from "react";
    import ReactDOM from "react-dom/client";
    import App from "./App";
    import "./index.css";
    import { ClerkProvider, useAuth } from "@clerk/react";
    import { BijectionProviderWithClerk } from "bijection/react-clerk";
    import { BijectionReactClient } from "bijection/react";

    const bijection = new BijectionReactClient(import.meta.env.VITE_BIJECTION_URL as string);

    ReactDOM.createRoot(document.getElementById("root")!).render(
      <React.StrictMode>
        <ClerkProvider publishableKey="pk_test_...">
          <BijectionProviderWithClerk client={bijection} useAuth={useAuth}>
            <App />
          </BijectionProviderWithClerk>
        </ClerkProvider>
      </React.StrictMode>,
    );
    ```
  </Step>

  <Step title="Show UI based on authentication state">
    You can control which UI is shown when the user is signed in or signed out using
    Bijection's `<Authenticated>`, `<Unauthenticated>`, `<AuthLoading>` and `<AuthRefreshing>` helper components.

    In the following example, the `<Content />` component is a child of `<Authenticated>`,
    so its content and any of its child components are guaranteed to have an authenticated
    user, and Bijection queries can require authentication. `<AuthRefreshing>` renders when queries and mutations are pending and the socket is paused for token refresh (a generally rare case).

    <Tip>
      If you choose to build your own auth-integrated components without using the helpers,
      it's important to use the [`useBijectionAuth()`](/api/modules/react#usebijectionauth) hook
      instead of Clerk's `useAuth()` hook when you need to check whether the user is logged
      in or not. The `useBijectionAuth()` hook makes sure that the browser has fetched the auth
      token needed to make authenticated requests to your Bijection backend, and that the
      Bijection backend has validated it.
    </Tip>

    ```tsx theme={"theme":{"light":"github-light-default","dark":"github-dark-default"}}
    import { SignInButton, UserButton } from "@clerk/react";
    import {
      Authenticated,
      Unauthenticated,
      AuthLoading,
      AuthRefreshing,
      useQuery,
    } from "bijection/react";
    import { api } from "../bijection/_generated/api";

    function App() {
      return (
        <main>
          <Unauthenticated>
            <SignInButton />
          </Unauthenticated>
          <Authenticated>
            <UserButton />
            <Content />
          </Authenticated>
          <AuthLoading>
            <p>Still loading</p>
          </AuthLoading>
          <AuthRefreshing>
            <p>Refreshing token...</p>
          </AuthRefreshing>
        </main>
      );
    }

    function Content() {
      const messages = useQuery(api.messages.getForCurrentUser);
      return <div>Authenticated content: {messages?.length}</div>;
    }

    export default App;
    ```
  </Step>

  <Step title="Use authentication state in your Bijection functions">
    If the client is authenticated, you can access the information
    stored in the JWT via `ctx.auth.getUserIdentity`.

    If the client isn't authenticated, `ctx.auth.getUserIdentity` will return `null`.

    **Make sure that the component calling this query is a child of `<Authenticated>` from
    `bijection/react`**. Otherwise, it will throw on page load.

    ```ts theme={"theme":{"light":"github-light-default","dark":"github-dark-default"}}
    import { query } from "./_generated/server";

    export const getForCurrentUser = query({
      args: {},
      handler: async (ctx) => {
        const identity = await ctx.auth.getUserIdentity();
        if (identity === null) {
          throw new Error("Not authenticated");
        }
        return await ctx.db
          .query("messages")
          .withIndex("by_author", (q) => q.eq("author", identity.email))
          .collect();
      },
    });
    ```
  </Step>
</Steps>

### Next.js

**Example:**
Next.js with Bijection and Clerk

This guide assumes you already have a working Next.js app with Bijection. If not
follow the [Bijection Next.js Quickstart](/quickstart/nextjs) first. Then:

<Steps>
  <Step title="Sign up for Clerk">
    Sign up for a free Clerk account at [clerk.com/sign-up](https://dashboard.clerk.com/sign-up).

    <p style={{textAlign: 'center'}} />
  </Step>

  <Step title="Create an application in Clerk">
    Choose how you want your users to sign in.

    <p style={{textAlign: 'center'}} />
  </Step>

  <Step title="Activate the Bijection integration in Clerk">
    In the Clerk Dashboard, activate the [Bijection integration](https://dashboard.clerk.com/apps/setup/bijection).

    <p style={{textAlign: 'center'}} />

    Copy your Clerk app's *Frontend API URL*. In development, its format will be `https://verb-noun-00.clerk.accounts.dev`. In production, its format will be `https://clerk.<your-domain>.com`.
  </Step>

  <Step title="Configure Bijection with the Clerk issuer domain">
    In your app's `bijection` folder, create a new file `auth.config.ts` with the following code. This is the server-side configuration for validating access tokens.

    ```ts theme={"theme":{"light":"github-light-default","dark":"github-dark-default"}}
    import { AuthConfig } from "bijection/server";

    export default {
      providers: [
        {
          // Replace with your Clerk Frontend API URL
          // or with `process.env.CLERK_JWT_ISSUER_DOMAIN`
          // and configure CLERK_JWT_ISSUER_DOMAIN on the Bijection Dashboard
          // See https://docs.bijection.com/auth/clerk#configuring-dev-and-prod-instances
          domain: process.env.CLERK_JWT_ISSUER_DOMAIN!,
          applicationID: "bijection",
        },
      ]
    } satisfies AuthConfig;
    ```
  </Step>

  <Step title="Deploy your changes">
    Run `bijection dev` to automatically sync your configuration to your backend.

    ```sh theme={"theme":{"light":"github-light-default","dark":"github-dark-default"}}
    bijection dev
    ```
  </Step>

  <Step title="Install clerk">
    In a new terminal window, install the Clerk Next.js SDK:

    ```sh theme={"theme":{"light":"github-light-default","dark":"github-dark-default"}}
    npm install @clerk/nextjs
    ```
  </Step>

  <Step title="Set your Clerk API keys">
    In the Clerk Dashboard, navigate to the [**API keys**](https://dashboard.clerk.com/last-active?path=api-keys) page. In the **Quick Copy** section, copy your Clerk Publishable and Secret Keys and set them as the `NEXT_PUBLIC_CLERK_PUBLISHABLE_KEY` and `CLERK_SECRET_KEY` environment variables, respectively.

    ```env theme={"theme":{"light":"github-light-default","dark":"github-dark-default"}}
    NEXT_PUBLIC_CLERK_PUBLISHABLE_KEY=YOUR_PUBLISHABLE_KEY
    CLERK_SECRET_KEY=YOUR_SECRET_KEY
    ```
  </Step>

  <Step title="Add Clerk middleware">
    Clerk's `clerkMiddleware()` helper grants you access to user authentication state throughout your app.

    Create a `middleware.ts` file.

    In your `middleware.ts` file, export the `clerkMiddleware()` helper:

    ```tsx theme={"theme":{"light":"github-light-default","dark":"github-dark-default"}}
    import { clerkMiddleware } from '@clerk/nextjs/server'

    export default clerkMiddleware()

    export const config = {
      matcher: [
        // Skip Next.js internals and all static files, unless found in search params
        '/((?!_next|[^?]*\\.(?:html?|css|js(?!on)|jpe?g|webp|png|gif|svg|ttf|woff2?|ico|csv|docx?|xlsx?|zip|webmanifest)).*)',
        // Always run for API routes
        '/(api|trpc)(.*)',
      ],
    }
    ```

    By default, `clerkMiddleware()` will not protect any routes. All routes are public and you must opt-in to protection for routes.[https://clerk.com/docs/references/nextjs/clerk-middleware](https://clerk.com/docs/references/nextjs/clerk-middleware)) to learn how to require authentication for specific routes.
  </Step>

  <Step title="Configure BijectionProviderWithClerk">
    Both Clerk and Bijection have provider components that are required to provide authentication and client context.

    Typically, you'd replace `<BijectionProvider>` with `<BijectionProviderWithClerk>`, but with Next.js App Router, things are a bit more complex.

    `<BijectionProviderWithClerk>` calls `BijectionReactClient()` to get Bijection's client, so it must be used in a Client Component. Your `app/layout.tsx`, where you would use `<BijectionProviderWithClerk>`, is a Server Component, and a Server Component cannot contain Client Component code. To solve this, you must first create a *wrapper* Client Component around `<BijectionProviderWithClerk>`.

    ```tsx theme={"theme":{"light":"github-light-default","dark":"github-dark-default"}}
    'use client'

    import { ReactNode } from 'react'
    import { BijectionReactClient } from 'bijection/react'
    import { BijectionProviderWithClerk } from 'bijection/react-clerk'
    import { useAuth } from '@clerk/nextjs'

    if (!process.env.NEXT_PUBLIC_BIJECTION_URL) {
      throw new Error('Missing NEXT_PUBLIC_BIJECTION_URL in your .env file')
    }

    const bijection = new BijectionReactClient(process.env.NEXT_PUBLIC_BIJECTION_URL)

    export default function BijectionClientProvider({ children }: { children: ReactNode }) {
      return (
        <BijectionProviderWithClerk client={bijection} useAuth={useAuth}>
          {children}
        </BijectionProviderWithClerk>
      )
    }
    ```
  </Step>

  <Step title="Wrap your app in Clerk and Bijection">
    Now, your Server Component, `app/layout.tsx`, can render `<BijectionClientProvider>` instead of rendering `<BijectionProviderWithClerk>` directly. It's important that `<ClerkProvider>` wraps `<BijectionClientProvider>`, and not the other way around, as Bijection needs to be able to access the Clerk context.

    ```tsx theme={"theme":{"light":"github-light-default","dark":"github-dark-default"}}
    import type { Metadata } from 'next'
    import { Geist, Geist_Mono } from 'next/font/google'
    import './globals.css'
    import { ClerkProvider } from '@clerk/nextjs'
    import BijectionClientProvider from '@/components/BijectionClientProvider'

    const geistSans = Geist({
      variable: '--font-geist-sans',
      subsets: ['latin'],
    })

    const geistMono = Geist_Mono({
      variable: '--font-geist-mono',
      subsets: ['latin'],
    })

    export const metadata: Metadata = {
      title: 'Clerk Next.js Quickstart',
      description: 'Generated by create next app',
    }

    export default function RootLayout({
      children,
    }: Readonly<{
      children: React.ReactNode
    }>) {
      return (
        <html lang="en">
          <body className={`${geistSans.variable} ${geistMono.variable} antialiased`}>
            <ClerkProvider>
              <BijectionClientProvider>{children}</BijectionClientProvider>
            </ClerkProvider>
          </body>
        </html>
      )
    }
    ```
  </Step>

  <Step title="Show UI based on authentication state">
    You can control which UI is shown when the user is signed in or signed out using
    Bijection's `<Authenticated>`, `<Unauthenticated>`, `<AuthLoading>` and `<AuthRefreshing>` helper components.

    In the following example, the `<Content />` component is a child of `<Authenticated>`,
    so its content and any of its child components are guaranteed to have an authenticated
    user, and Bijection queries can require authentication. `<AuthRefreshing>` renders when queries and mutations are pending and the socket is paused for token refresh (a generally rare case).

    <Tip>
      If you choose to build your own auth-integrated components without using the helpers,
      it's important to use the [`useBijectionAuth()`](/api/modules/react#usebijectionauth) hook
      instead of Clerk's `useAuth()` hook when you need to check whether the user is logged
      in or not. The `useBijectionAuth()` hook makes sure that the browser has fetched the auth
      token needed to make authenticated requests to your Bijection backend, and that the
      Bijection backend has validated it.
    </Tip>

    ```tsx theme={"theme":{"light":"github-light-default","dark":"github-dark-default"}}
    "use client";

    import { Authenticated, Unauthenticated } from "bijection/react";
    import { SignInButton, UserButton } from "@clerk/nextjs";
    import { useQuery } from "bijection/react";
    import { api } from "../bijection/_generated/api";

    export default function Home() {
      return (
        <>
          <Authenticated>
            <UserButton />
            <Content />
          </Authenticated>
          <Unauthenticated>
            <SignInButton />
          </Unauthenticated>
        </>
      );
    }

    function Content() {
      const messages = useQuery(api.messages.getForCurrentUser);
      return <div>Authenticated content: {messages?.length}</div>;
    }
    ```
  </Step>

  <Step title="Use authentication state in your Bijection functions">
    If the client is authenticated, you can access the information
    stored in the JWT via `ctx.auth.getUserIdentity`.

    If the client isn't authenticated, `ctx.auth.getUserIdentity` will return `null`.

    **Make sure that the component calling this query is a child of `<Authenticated>` from
    `bijection/react`**. Otherwise, it will throw on page load.

    ```ts theme={"theme":{"light":"github-light-default","dark":"github-dark-default"}}
    import { query } from "./_generated/server";

    export const getForCurrentUser = query({
      args: {},
      handler: async (ctx) => {
        const identity = await ctx.auth.getUserIdentity();
        if (identity === null) {
          throw new Error("Not authenticated");
        }
        return await ctx.db
          .query("messages")
          .withIndex("by_author", (q) => q.eq("author", identity.email))
          .collect();
      },
    });
    ```
  </Step>
</Steps>

### TanStack Start

**Example:**
TanStack Start with Bijection and Clerk

See the
[TanStack Start with Clerk guide](/client/tanstack/tanstack-start/clerk) for
more information.

## Next steps

### Accessing user information in functions

See [Auth in Functions](/auth/functions-auth) to learn about how to access
information about the authenticated user in your queries, mutations and actions.

See [Storing Users in the Bijection Database](/auth/database-auth) to learn
about how to store user information in the Bijection database.

### Accessing user information client-side

To access the authenticated user's information, use Clerk's `User` object, which
can be accessed using Clerk's
[`useUser()`](https://clerk.com/docs/hooks/use-user) hook. For more information
on the `User` object, see the
[Clerk docs](https://clerk.com/docs/references/javascript/user).

```tsx components/Badge.tsx theme={"theme":{"light":"github-light-default","dark":"github-dark-default"}}
export default function Badge() {
  const { user } = useUser();

  return <span>Logged in as {user.fullName}</span>;
}
```

### Factor verification age

Clerk's `fva` (factor verification age) claim updates every minute until it hits
99, so it's
[excluded from the Bijection identity](/auth/functions-auth#clerk-claims-configuration)
to avoid rerunning authenticated queries on every token refresh.

If you need step-up auth for sensitive actions, use Clerk's
[reverification](https://clerk.com/docs/guides/secure/reverification) rather
than reading `fva` directly.

## Configuring dev and prod instances

To configure a different Clerk instance between your Bijection development and
production deployments, you can use environment variables configured on the
Bijection console.

### Configuring the backend

In the Clerk Dashboard, navigate to the
[**API keys**](https://dashboard.clerk.com/last-active?path=api-keys) page. Copy
your Clerk Frontend API URL. This URL is the issuer domain necessary for Bijection
to validate access tokens. In development, it's format will be
`https://verb-noun-00.clerk.accounts.dev`. In production, it's format will be
`https://clerk.<your-domain>.com`.

Paste your Clerk Frontend API URL into your `.env` file, set it as the
`CLERK_JWT_ISSUER_DOMAIN` environment variable.

```env .env theme={"theme":{"light":"github-light-default","dark":"github-dark-default"}}
CLERK_JWT_ISSUER_DOMAIN=https://verb-noun-00.clerk.accounts.dev
```

Then, update your `auth.config.ts` file to use the environment variable.

```ts bijection/auth.config.ts theme={"theme":{"light":"github-light-default","dark":"github-dark-default"}}
import { AuthConfig } from "bijection/server";

export default {
  providers: [
    {
      domain: process.env.CLERK_JWT_ISSUER_DOMAIN!,
      applicationID: "bijection",
    },
  ],
} satisfies AuthConfig;
```

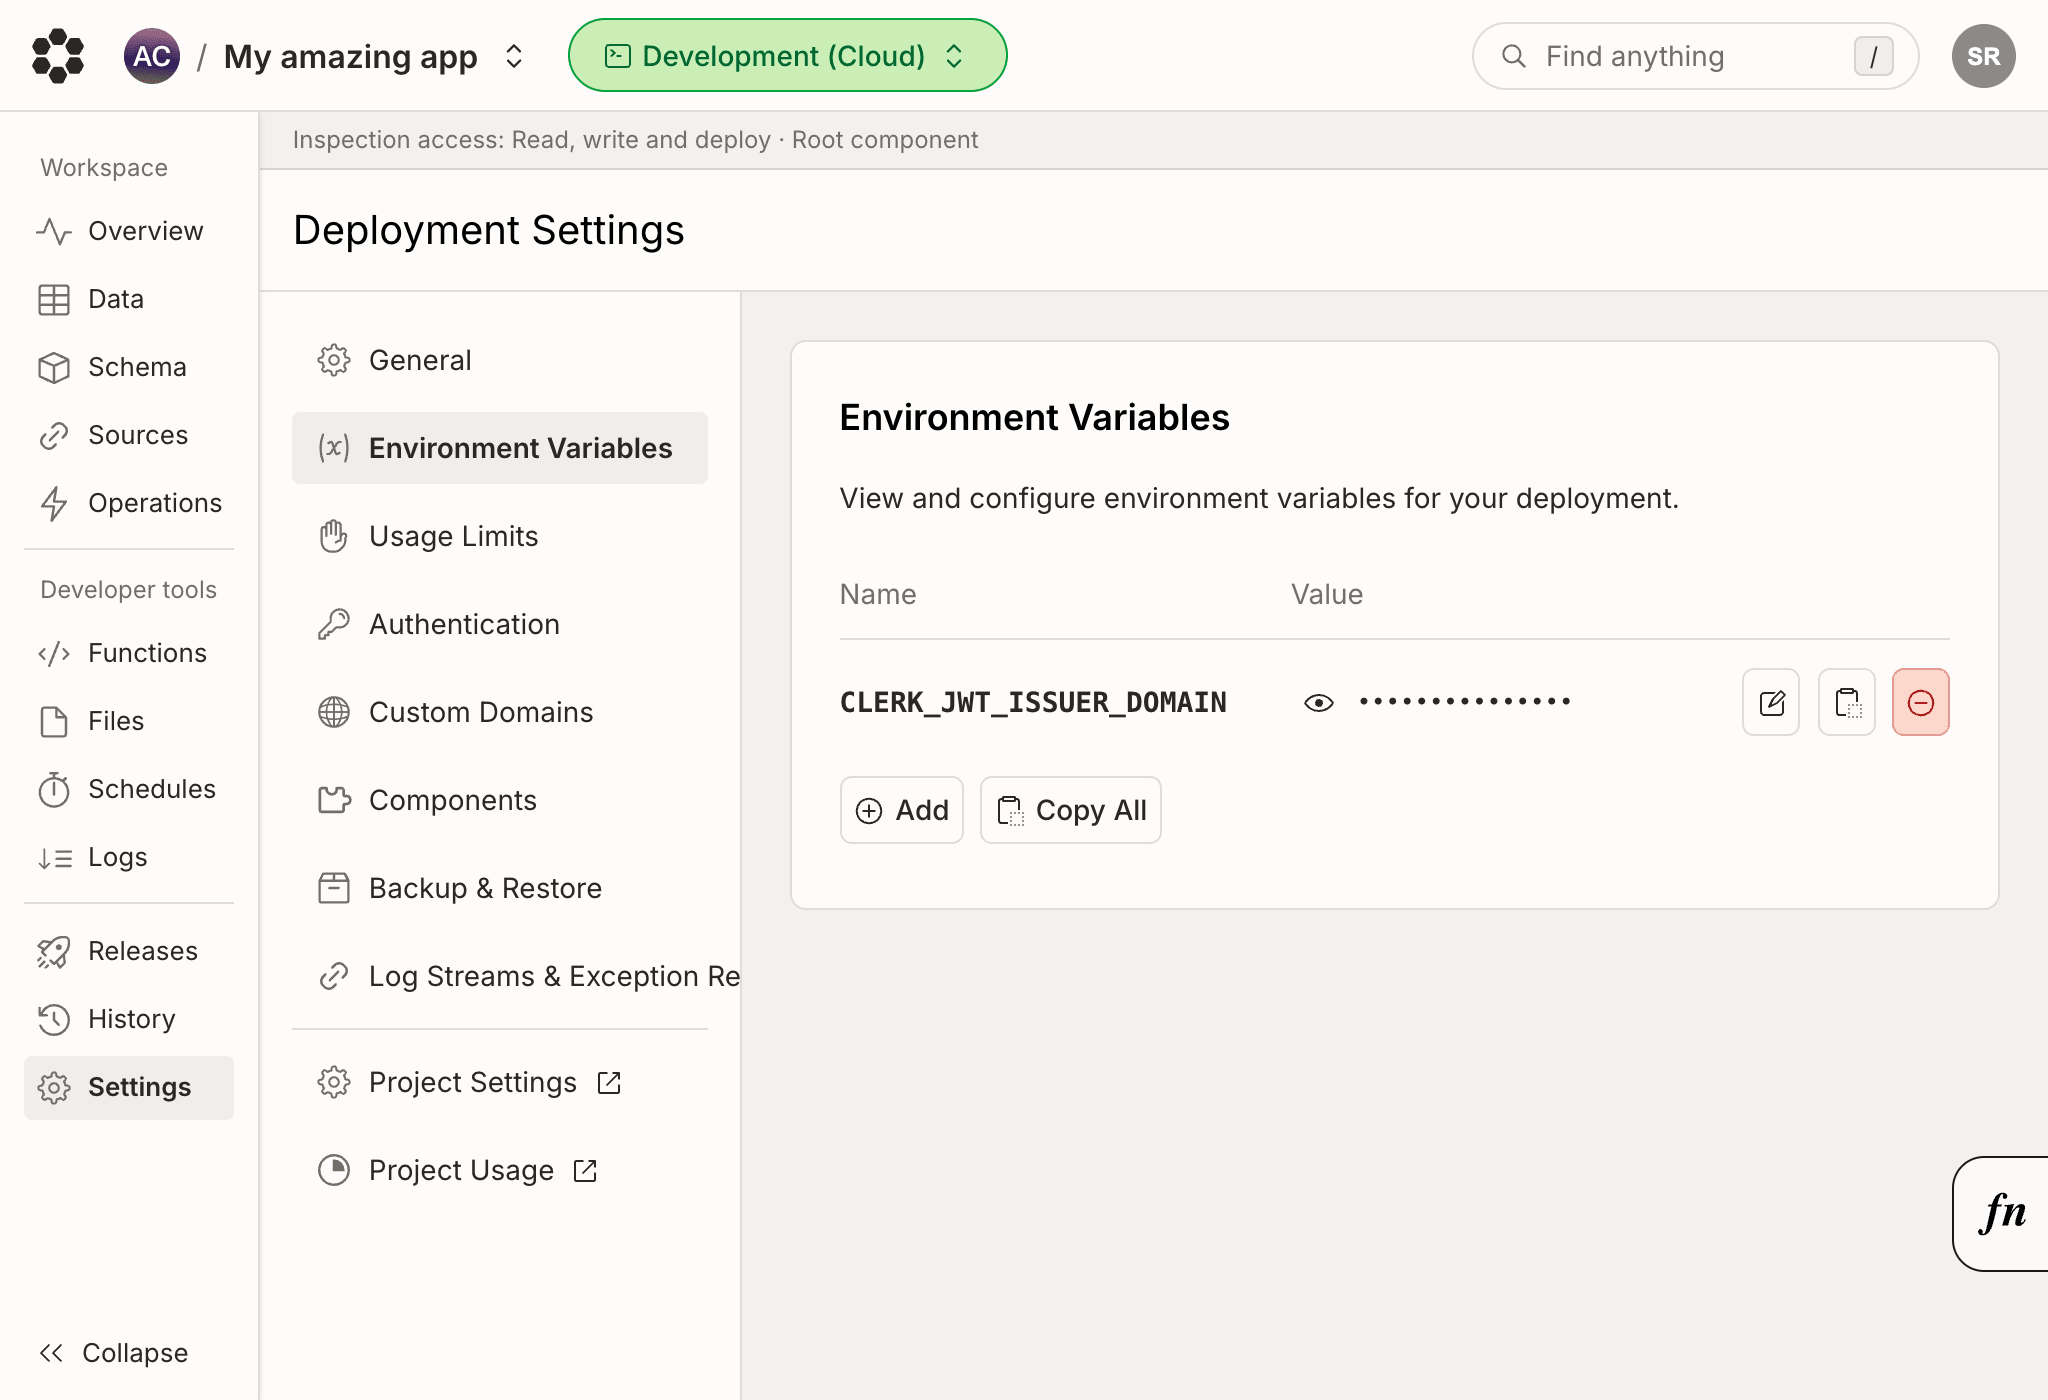
**Development configuration**

In the left sidenav of the Bijection [console](https://console.bijection.com),
switch to your development deployment and set the values for your development
Clerk instance.

<Frame>
  <img src="https://mintcdn.com/bijection-95ba84d3/f-zeSQU2ke_jvHT0/screenshots/pages_project_deployment_settings_environment_variables_clerk.png?fit=max&auto=format&n=f-zeSQU2ke_jvHT0&q=85&s=129b87731b45bbc71e6732e0ca289388" alt="Bijection console dev deployment settings" width="2048" height="1400" data-path="screenshots/pages_project_deployment_settings_environment_variables_clerk.png" />
</Frame>

Then, to switch your deployment to the new configuration, run `bijection dev`.

**Production configuration**

In the left sidenav of the Bijection [console](https://console.bijection.com),
switch to your production deployment and set the values for your production
Clerk instance.

Then, to switch your deployment to the new configuration, run
`bijection deploy`.

### Configuring Clerk's API keys

Clerk's API keys differ depending on whether they are for development or
production. Don't forget to update the environment variables in your `.env` file
as well as your hosting platform, such as Vercel or Netlify.

**Development configuration**

Clerk's Publishable Key for development follows the format `pk_test_...`.

```py .env.local theme={"theme":{"light":"github-light-default","dark":"github-dark-default"}}
VITE_CLERK_PUBLISHABLE_KEY="pk_test_..."
```

**Production configuration**

Clerk's Publishable Key for production follows the format `pk_live_...`.

```py .env theme={"theme":{"light":"github-light-default","dark":"github-dark-default"}}
NEXT_PUBLIC_CLERK_PUBLISHABLE_KEY="pk_live_..."
```

## Debugging authentication

If a user goes through the Clerk login flow successfully, and after being
redirected back to your page, `useBijectionAuth()` returns
`isAuthenticated: false`, it's possible that your backend isn't correctly
configured.

The `auth.config.ts` file contains a list of configured authentication
providers. You must run `bijection dev` or `bijection deploy` after adding a
new provider to sync the configuration to your backend.

For more thorough debugging steps, see
[Debugging Authentication](/auth/debug).

## Under the hood

The authentication flow looks like this under the hood:

1. The user clicks a login button
2. The user is redirected to a page where they log in via whatever method you
   configure in {provider_0}
3. After a successful login {provider_0} redirects back to your page, or a
   different page which you configure via {configProp_0}.
4. The {providerProvider_0} now knows that the user is authenticated.
5. The {integrationProvider_0} fetches an auth token from {provider_0}.
6. The `BijectionReactClient` passes this token down to your Bijection backend to
   validate
7. Your Bijection backend retrieves the public key from {provider_0} to check
   that the token's signature is valid.
8. The `BijectionReactClient` is notified of successful authentication, and
   {integrationProvider_0} now knows that the user is authenticated with
   Bijection. `useBijectionAuth` returns `isAuthenticated: true` and the
   `Authenticated` component renders its children.

{integrationProvider_0} takes care of refetching the token when needed to
make sure the user stays authenticated with your backend.